5 October 2017

Trick or Treat

Hello my lovelies I hope you are all well.  I'm back tonight to share with you my make for Crafty Sentiments Designs release week Day 3, albeit a little later than planned due to pesky internet problems.

So let me introduce you to this cute little dude he is 'Trick or Treat' and he's a digi so perfect for lots of different size projects.  I love it when I can resize to whatever I'm working on don't you.

I've made a milk carton treat holder with my nephew in mind.  He will love this if my daughter doesn't grab it first!!

Medium:  copics


My usual close-up.  I decided to cut him out and 3d him with some glue gel. 

Copics used

Skin:  E000, E11, E13, R30
Hair:  E43
Clothes:  C1, C2, C3, C5, C7, 100
Treat Bag:  Promarkers Amber, Pumpkin, Bright Orange, Burnt Orange

Okay, this cute little dude can be found over in the Crafty Sentiments Designs store here and if you fancy and a little looksie at some gorgeous inspiration pop across to Crafty Sentiments Designs Inspiration blog here where you can see lots of gorgeousness from my teamies.

Okay time for me to go.  I've a list of stuff to get sorted as my son is off on his Duke of Edinburgh Bronze award this weekend and it's his birthday on Sunday so I've that to sort for when he gets back to and as usual I'm not organised lol. 

I hope you have a fab weekend and if it's ploppy weather you have a perfect excuse to craft more!!

Take care.
Ann-Marie
xxx


Challenges I would like to enter:-

Cute Card Thursday    -  anything goes

Let's Craft and Create  -  anything goes (optional witchy/autumnal)


4 October 2017

Halloween Outfit

Good morning my lovelies I hope your day is getting off to a good start.  We have the usual rushed school routine here before I head out to work on this absolutely beautiful autumnal morning.

So before I dash out the door, I wanted to pop in and share with you my latest creation for Day 2 of Crafty Sentiments Designs new release week.  I got to play with 'Halloween Outfit' and she is adorable and she is a digi so you can resize for any number of projects which is just fab.  Now apart from the usual trick or treating I do with the kiddies we don't really go all out for Halloween which is a shame as I do love it and I think that just has to change.  So I decided last year that I would make myself a new decoration each Halloween to put up rather than buy any and this year I opted to make a fun Halloween wreath.  I'm so pleased with how it turned out I may just make another.

Medium:  copics/spectrum noirs
Papers and ribbon from stash
Flowers from Wild Orchid Crafts

I thought I'd have a go at making myself a silver glitter cobweb to go at the back of the wreath.  I made this with my hot glue gun.  I just found myself a cobweb image to print off from Google, put some greaseproof paper over the top and used it as a template.  It was so simple and it turned out really effective.


My usual close-up of the cute image and I've used a mixture of Copics and Spectrum Noirs to colour her in.

Copics/Spectrum Noirs

Face/Body:  E000, E11, E13, R20
Hair:  Y21, YR31, YR23
Pumpkin:  YR00, YR02, YR07, E08
Outfit:  TN2, TN3, TN4, TN5/EB3, EB5, EB6
Candy:  PL1, PL3, PL5

Why not pop across to Crafty Sentiments Designs Inspiration blog here and have a good old gander at some of my teamies makes, you won't be disappointed I promise and don't forget this new release week are digis and can be found over at Crafty Sentiments Designs store here.

Okay, time for me to dash.  I'll be back tomorrow to share with you another little Halloween make I've made.

Take care and happy crafting.

Ann-Marie
xxx


I would like to enter my card into the following challenge:- 

Cute Card Thursday  -  Trick or Treat

Craftaholics are us  -  Halloween


24 September 2017

Christmas Melodies

Good morning and what a beautiful autumnal morning it is.  I'm sat doing my post with my first coffee of the day, nobody else in the house is up and my back door is wide open and all I can hear are the birds and its beautiful.

So my post today is to share with you another Christmas card made using a gorgeous Crafty Sentiments Designs image called 'Christmas Melodies'.  I decided to get my prismacolor pencils out for this one and to work on Kraft for a change and I'd forgotten how much I love pencils on Kraft.

Medium:  Prismacolor Pencils

As you can see I've kept it nice and simple so it's all about the image and I love it.  Next up is  the usual close up of the image.  I didn't blend the pencils this time with Sansodor and paper stumps like I normally do I just used the lightest pencil each time.  Love how vibrant it's turned out.  Obviously there's a little glitter there on the snow but the photo's are not picking it up very well.


Okay so that's all from me today folks.  I hope you're having a lovely weekend and the weather is staying kind for you, but hey if it's not it's a perfect excuse to get crafting!

Don't forget this image is available over at the Crafty Sentiments Designs store here and you can always visit the Crafty Sentiments Designs Inspirational blog here where you can get tons of inspiration from my team mates.

Take care.
Ann-Marie 
xxx

Challenges I would like to enter:-

Creative Inspirations  -  seasonal

The Ribbon Girls challenge  -  September 'use any image' challenge

Winter Wonderland  -  wrap it up


16 September 2017

Feathered Friends

Good morning and a very happy Saturday to you my lovelies.  So how are we all doing with our Christmas makes? I'm doing okay I'm happy I've made a few but I need to get cracking and now that the kiddiewinkles have gone back to school I'm hoping I can get a shift on.

I have my latest make to share with you today and yes it is a Christmas card so that's another off the list.  I've made a criss cross card this time as I haven't made this style in a while.  I used the adorable LOTV image 'Feathered Friends' and coloured it in with my copics.  I made another poinsettia and covered it with Twinklets.  This die really does make a beautiful flower but I've found to get the full effect it is best to double up the bottom layer.  I hope the piccies are clear enough for you I'm struggling to get decent shots lately it's either too gloomy or brilliant sunshine I think a light box is going on my Christmas list this year!!

Medium:  copics
Papers:  First Edition 'Festive Treats'
Dies:  Spellbinders 'Poinsettia', Spellbinders 'Floral Ovals', Spellbinders 'Fleur de Lis rectangles', Dienamics 'Royal Leaf' set, Cheery Lynn 'Holly Flourish'
Twine, ribbon, sentiment from stash


Next up my usual close-up.  This is such a sweet image and really very easy to colour.  Obviously a sprinkling of glitter made an appearance.  Well it is a Crimbo card so it would be rude not too!!


So that's all from me today folks.  I'm off to have a rummage through some stamps so I can have a play.  Not sure what I fancy colouring up so I'll see where it takes me.  I hope you all have a great weekend and manage to get a little crafty.

Take care.
Ann-Marie 
xxx

Challenges I would like to enter:-

Creative Inspirations  -  seasonal

The Ribbon Girls  -  anything goes 'Card' challenge

Winter Wonderland  -  wrap it up

Christmas at Sweet Stampin  -  anything goes

Noor Design U.K.  -  layers

Sweet Stampers Challenge  -  lots of layers


5 September 2017

A little mermaid magic

Hello and a very happy Tuesday to you all.  Both of my kiddiewinkles have gone back to school now and my youngest has gone off to secondary school.  Not sure how I feel about that one.  Sad I think as they are growing up way too fast for my liking.  On a plus note though I've never seen her so excited about going to school I mean she had her bag packed like weeks ago!!

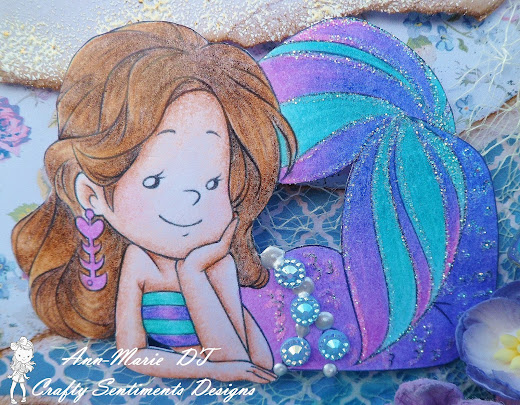
Anyway, I am here today to share with you a little project I have done using one of Crafty Sentiments Designs adorable little images.  I chose to work with Mermaid Day Dream as both my daughter and I think she is adorable so I  made a little canvas to go on her bedroom wall.


Image:  Crafty Sentiments Designs 'mermaid day dream'
Medium:  Prismacolor pencils
Papers:  Raspberry Road 'Sea Pearls' digi papers
Flowers:  Wild Orchid Crafts and stash


My usual close-up of the image.  I coloured her with Prismacolor pencils blended with Sansador for a change and obviously she needed a little sparkle.


Okay, that's all from me this evening.  I'm off to make myself a coffee and to settle into a little colouring.  Hope you all have a great week.

Take care and happy crafting.
Ann-Marie 
xx

Challenges I would like to enter:-

Simon Says Stamp  -  anything goes

Cute Card Thursday  -  too cute

Noor Design U.K.  -  layers

Stamping Sensations  -  photo inspiration


14 August 2017

Bunnies Ho Ho Ho

Hello my lovelies and a very happy Monday to you.  So we are sort of half way through the school holidays and I think the kiddieswinkles have just about had enough time off now they're just getting a little restless and I've had a couple of 'I'm bored' comments.  It doesn't help that the weather has been ploppy so we've not really been able to plan much but hey my daughter has been having lots of fun making slime and I've just bought some air dry clay so that should be fun!

Anyway, I've finally finished another Christmas card which I've had sat on my desk all weekend.  This time I've used the cute LOTV 'Bunnies Ho Ho Ho' and it really is the most adorable little image.  As usual I've used my copics to colour it up which literally took no time at all once I'd decided to go with brown bunnies rather than grey.

Image:  LOTV 'Bunnies Ho Ho Ho'
Medium:  copics
Papers:  First Edition 'Nordic Christmas'
Dies:  Spellbinders 'Romantic Rectangles' & Layered Poinsettia, Joy Crafts 'Winter Wishes' snowflake border, Cheery Lynn Designs 'Holly Flourish', Marianne Design Creatables Christmas Tree, Crafters Companion 'Decorative Holly'


I went a bit OTT with the Twinklets but I do love them as snow and on the poinettia and pine cones they add some lovely texture.  The little wooden sign was a fab find in Hobbycraft and I got 5 in a pack for something like £2 so a bargain!


Usual close up of the sweet image and you can see the Twinklets a little better too. 

Copics

Bunnies:  E31, E33, E35, E37/E50, E53/R12
Branches:  E31, E33, E35, E37, E29
Leaves:  YG23, YG63, YG67
Berries:  R14, R17, R29

Okay so that's all from me today folks.  I have a little time left still before I have to make it look like I've been doing housewifely things you know the 10 minute dash with the hoover and a quick tidy round!!

Take care and happy crafting.
Ann-Marie 
xxx

Challenges I would like to enter:


Noor Design UK  -  anything goes

Stamping Sensations  -  anything goes


5 August 2017

Crafty Sentiments Designs August new release week - Day 5

Good morning and a very happy Saturday to you.  I was up bright and early this morning before anyone else so I could grab my cup of coffee and chill in peace until everyone rises and I have to go to work.  It's a simple thing I know but I really do appreciate just a little quiet time with my coffee in the morning, just give me that 1/2 hour and I can cope with whatever the day throws at me!

Anyway, I'm popping in to share with you my make for Crafty Sentiments Designs Day 5 of their new digi release and I got to play with the fab 'delivery our presents'.  So when I was hopping around blogland and Pinterest a while ago I spotted a few Christmas cards with doors on and I thought how simple and elegant they looked and thought I would incorporate the two like she was delivering presents someone's house.

I can't remember where I've seen these cards as I was hopping all over the place but I'm pretty certain they used a die of some sort.  Well I don't have a die but thought it can't be that difficult to make one I'll have a go myself.  In all honesty it was easy all I did was decide on the size door I wanted and cut some rectangles and squares to represent the door and panels, inked up the edges for definition, added some foam pads for depth and voila one door made.  For the handle I just cut down a large peel off strip and added a brad.  I thought a wreath would look nice on the door so used my Martha Stewart branch punch to make a circle and added some gems and I'm really pleased with the effect.

The main focus of course is the adorable image which I resized slightly larger and coloured her up with copics.  I cut her out so I could 3d her on my card with some glue gel and I think she looks rather sweet.

Medium:  copics


It's a larger card than normal for me measuring in at 8 x 8 and quite a simple one too but I think it works.  Here's my usual close up the cute image.  She's so sweet I wonder if one of those parcels is for me full of crafty goodies!!

Copics

Skin:  E000, E11, E13, R20
Hair/Boots:  E31, E35, E37, E29
Clothes:  G07, G14, G28/YR31, YR23/R12, R14, R17, R29/E50, E53
Dog:  W0, W1, W3, W5, W7

Right I have some chores to do and I suppose I best feed the munchkins and then hopefully I may get to sneak back into my craft room.  Don't forget to hope over to the Crafty Sentiments Designs Inspiration blog where you'll be able to see some more gorgeous makes with this image.

Take care and happy crafting.
Ann-Marie 
xx


4 August 2017

Crafty Sentiment Designs August release week - Day 4

Good morning and a very happy Friday to you folks.  We've woken up to a dry day at the moment so fingers crossed it stays that way.

Anyway I am here today to share with you my make for Day 4 of Crafty Sentiments Designs August release week and today I get to show you 'wishing on a star'.  I was looking through all my Christmas papers and came across an older pad which I'd buried away as you do and thought I'd use up some of that.  So for my card my colour scheme is non traditional but I really like how it turned out.  I decided that the curtains in the image would look great paper pieced so with it being a digi image I cut down some of my designer paper and printed it out on to that.  

Medium:  copics/spectrum noirs
Papers:  My Mind's Eye 'Wonderful Winter'
Dies:  Crafters Companion 'holly', Memory Box 'precious ornaments', Spellbinders 'floral ovals' 
Flowers/Ribbon/Lace:  Wild Orchid Crafts and stash


I cut out some baubles using the Memory Box ornament die and didn't like them cut out of Kraft so I just covered them in Aged Ivory Frantage and love them that way.  I need to get some different coloured frantage now as I can see me using this die a lot.

My usual close up of the image.  She's so sweet just reminds me of my daughter when she was a little younger listening out for Santa's bells.

Copics

Face/Body:  E000, E11, E13, R81
Clothes:  R81, R83, R85, R39
Rug:  BG01, BG45, BG49
Hair:  E31, E35, E37, E29
Sky:  B91, B93, B95, B97
Puppy:  Spectrum Noirs TN2, TN3, EB4

Right that is all from me today folks.  Don't forget to check out the Crafty Sentiments Designs Inspirational blog where you can see some gorgeous makes from my team mates and the images from this week are all available here in the store.

Got to get lively mean't to be leaving for work! 

Take care and happy crafting.
Ann-Marie 
xx

Challenges I would to enter:-

Winter Wonderland  -  use ribbon, twine or lace

Christmas at Sweet Stampin  -  anything goes

Noor Design U.K.  -  anything goes


2 August 2017

Crafty Sentiments August new release week - Day 2

Good morning my lovelies and I hope you are all in fine spirits.  We have another soggy day here today and after such a beautiful and warm day yesterday too.  Seriously you can get whiplash from our good old British weather you never really know quite what you're going to wake up to!

So anyway I've popped in today as it's Crafty Sentiments Designs August new release week yay and it's a digi release this time too so instant gratification even better!!

So it's day 2 and my turn to share with you a little something and I got to play with the gorgeous 'My Little Helper'.  The theme this time is Christmas so I've actually made my first Christmas project of the year.  I saw when I was browsing a little while ago a gift card holder idea (can't remember where unfortunately) but I thought I'd have a little go at one.  These are going to be so useful for giving gift cards so I will be making a few this year I can tell you.

Medium:  copics
Papers:  First Edition 'Nordic Christmas'
Crafters Companion Kraft Card, Neenah 'Desert Storm' kraft colouring card
Ribbon, twine and bells from stash


As you can see the beauty of having a digi is you can resize it.  So here I've got it printed out quite large for the inside and then I made it really small and printed it out on the tag to.


Lastly my usual close up of the image.  I decided to use colour on kraft this time which is a first for me with copics but I love the outcome.

copics

Face/body:  E000, E11, E00, E13
Clothes:  R14, R17, R29, W7/G24, G94, G99, W7/BG72, BG75
Hair:  E41, E43, E47, E49

Okay that's all from me today folks.  Don't forget the release is happening all week so pop over to the Crafty Sentiments Designs Inspirational blog for some lovely projects from my team mates and remember this release is digi so no waiting the images are available in the store now!!!

Take care and happy crafting.

Ann-Marie 
xx

Challenges I would like to enter:-

ABC Christmas challenge  -  P, Q, R  - I've gone for People and Red

Creative Inspirations  -  anything goes

Cute Card Thursday  -  anything goes

Christmas at Sweet Stampin  -  anything Christmas goes

Winter Wonderland  -  use a digi